Page 4 of 5
Re: Subcategories for Games
Posted: Sat Sep 11, 2010 8:33 am
by snarkhunter
Yes, you're rigth: I always forget about this feature. Thanks for reminding me of it.
Yet I'm now wondering about something else after checking a game that has some screenshots included ("Cosmic Invaders"): where should the ".pgn" files be stored to become available for inclusion?! The link for the title screen to the game is as follows:
|Image = [[Image:Cosmic_Invaders_00_Title.png|center|300px|Title screen]]
... But that doesn't tell me where the file is, or how/where it may be uploaded!

The
[Image:] tag would imply it is kind of a "local" (i.e. to the Wiki) address, but I could not find any management tool for picture files.
[Edit]
Ok, seems ok now: I found some information on the internet and I'm now registered with "wikimedia", so I should be able to upload pictures...
Re: Subcategories for Games
Posted: Sat Sep 11, 2010 8:45 am
by admin
When viewing the game page, you just need to click on the link that is displayed where the picture should be and if you are logged in it will ask you to upload a picture.
Re: Subcategories for Games
Posted: Sat Sep 11, 2010 9:08 am
by snarkhunter
admin wrote:When viewing the game page, you just need to click on the link that is displayed where the picture should be and if you are logged in it will ask you to upload a picture.
... as usual, then! But thank you.
I've managed to generate a screenshot using Ctrl+Alt, then "Paint". And it takes a little extra work to come out with a "neat" picture, i.e. one that does not have the emulator's black border/window's title bar. Actually, I was expecting such a feature to exist already. But it looks like I'll just be on my own there. I hope it won't be too difficult to generate screenshots exactly the same size every time (i.e. pixel-wise).
Now, I still have to test adding a picture to a Wiki game page... my next step!
Re: Subcategories for Games
Posted: Sat Sep 11, 2010 7:42 pm
by Alastair
snarkhunter wrote:I've managed to generate a screenshot using Ctrl+Alt, then "Paint". And it takes a little extra work to come out with a "neat" picture, i.e. one that does not have the emulator's black border/window's title bar. Actually, I was expecting such a feature to exist already. But it looks like I'll just be on my own there. I hope it won't be too difficult to generate screenshots exactly the same size every time (i.e. pixel-wise).
Now, I still have to test adding a picture to a Wiki game page... my next step!
If you are using Windows you may wish to try out IrfanView (
http://irfanview.com/). This free image viewer/manipulator will allow you to create accurately cropped pictures. If you take a screenshot of XRoar running at a screen scale of 1:1 (achieved by dragging the window frame until it is really small - it will spring back to 1:1 when you let go of the mouse button) then the following crop settings should strip out the frame and borders (if it doesn't then you are using a different title bar and frame size to me, see below).
With IrfanView running, Ctrl+V to retrieve the screenshot.
Use the menu to select "Edit > Create custom crop selection" or press Shift+C.
Change the settings to those shown in the image below
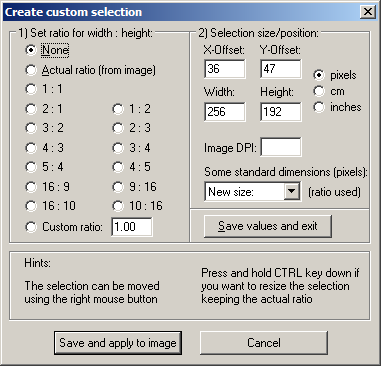
- IrfanView-Crop_Selection.png (7.78 KiB) Viewed 6436 times
and click on "Save and apply to image".
If the crop lines do not line line up then skip the next two lines and follow the instructions below.
Press Ctrl+Y.
Save the image in whatever format you wish.
Once you have the custom crop selection settings set, and so long as you do not change them, then cropping is just a simple matter of pressing:
Shift+C
[Return]
Ctrl+Y
S (to save)
If the crop lines do not line up
In this case click anywhere on the image outside of the crop marks and draw a box so that the top left corner lines up with the top left of the Dragon screen. Once this is done use the menu to select "Edit > Create custom crop selection" or press Shift+C and change all the settings apart from the X-Offset and Y-Offset to read the same as in the above image. Click on "Save and apply to image" and continue as before.
Re: Subcategories for Games
Posted: Sun Sep 12, 2010 9:48 am
by snarkhunter
Thanks for the new hints. I've been messing around with the software for a while and I am now wondering whether or not it is possible not to have the resulting ".png" files with that 1-pixel black border. So far, the only solution I found was to use 257x192 custom settings, so that nothing will be lost from the actual picture.
As in the attached examples (".zip" file).
- 1st one is 256x192: the issue is obvious on the "4" displayed in the top right corner
- 2nd one is 258x194: a blank line appears at the bottom, telling there's one too many; yet the picture is perfectly clear this way
- 3rd one is 257x192: that one looks good to me, too
So... which size/settings should I use in order to get "proper pictures" for the wiki? It seems obvious that 256x192 is not that good.
I might seem over-focused on "cosmetic details" here. But, if I'm really going to enter some kind of long-term work, I consider I should have it right from the very beginning...
Re: Subcategories for Games
Posted: Sun Sep 12, 2010 5:49 pm
by Alastair
Re. the Shock Trooper screenshots, I've tried this myself and it appears that your X and Y offsets need to be slightly different to mine. What happens if you keep it at 256x192 but change the X-Offset to 37 and the Y-Offset to 48?
Re: Subcategories for Games
Posted: Sun Sep 12, 2010 7:06 pm
by snarkhunter
Alastair wrote:What happens if you keep it at 256x192 but change the X-Offset to 37 and the Y-Offset to 48?
An even greater portion ot the bottom is lost...
Re: Subcategories for Games
Posted: Sun Sep 12, 2010 7:20 pm
by snarkhunter
... I seem to be getting the "best" result with the following settings: 256x192, 36, 53
So I assume these are the ones I should keep using from now on.
Yet I'm also wondering if I will actually be getting the very same result every day with given settings... (i.e. I should... but will I ?)
Re: Subcategories for Games
Posted: Sun Sep 12, 2010 9:06 pm
by Alastair
As Shock Trooper has a white border surrounding the image, working out the correct offsets is a little difficult. Try a normal text mode image, the contrast between the green screen and the border should make it easier to find the correct settings, and these settings should be applicable to graphics mode images.
Re: Subcategories for Games
Posted: Sun Sep 12, 2010 10:50 pm
by snarkhunter
Then this gives me (258x193, offset 35, 53) as my final settings... and these are what I'll now be using.
It only looks a bit strange to me that I have to set 258 across (which does make sense = actual screen width + 2), whereas "193 only" does the job for the vertical sizing... But it works fine this way, so why should I ask for more?!
And, once again, thank you very much for all the help and advice.