snarkhunter wrote:I've managed to generate a screenshot using Ctrl+Alt, then "Paint". And it takes a little extra work to come out with a "neat" picture, i.e. one that does not have the emulator's black border/window's title bar. Actually, I was expecting such a feature to exist already. But it looks like I'll just be on my own there. I hope it won't be too difficult to generate screenshots exactly the same size every time (i.e. pixel-wise).
Now, I still have to test adding a picture to a Wiki game page... my next step!
If you are using Windows you may wish to try out IrfanView (
http://irfanview.com/). This free image viewer/manipulator will allow you to create accurately cropped pictures. If you take a screenshot of XRoar running at a screen scale of 1:1 (achieved by dragging the window frame until it is really small - it will spring back to 1:1 when you let go of the mouse button) then the following crop settings should strip out the frame and borders (if it doesn't then you are using a different title bar and frame size to me, see below).
With IrfanView running, Ctrl+V to retrieve the screenshot.
Use the menu to select "Edit > Create custom crop selection" or press Shift+C.
Change the settings to those shown in the image below
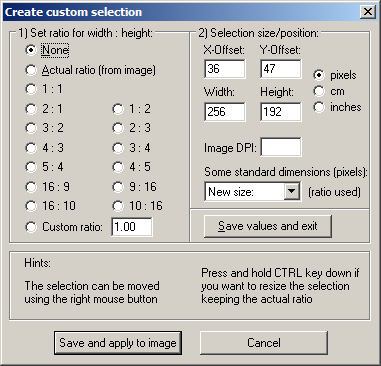
- IrfanView-Crop_Selection.png (7.78 KiB) Viewed 7245 times
and click on "Save and apply to image".
If the crop lines do not line line up then skip the next two lines and follow the instructions below.
Press Ctrl+Y.
Save the image in whatever format you wish.
Once you have the custom crop selection settings set, and so long as you do not change them, then cropping is just a simple matter of pressing:
Shift+C
[Return]
Ctrl+Y
S (to save)
If the crop lines do not line up
In this case click anywhere on the image outside of the crop marks and draw a box so that the top left corner lines up with the top left of the Dragon screen. Once this is done use the menu to select "Edit > Create custom crop selection" or press Shift+C and change all the settings apart from the X-Offset and Y-Offset to read the same as in the above image. Click on "Save and apply to image" and continue as before.
